Friday, October 15, 2010

Creating the Recessed Battery Box...

Jerry and I dragged the two 8D Lifeline AGM batteries over to the basic area where they would be mounted.

After some quick measurements we determined that we needed a 21" x 22" rectangular hole in the floor.

As you can see, Jerry cut out the hole in the 3/4 plywood floor with a Milwaukee Sawzall.

Jerry welded some steel bars across from one floor beam to the other and then added some sidewall steel to finish the box.

The two AGM batteries are inset in the floor now and are secured from damage when driving.

I took lots of pictures because most of the work on this part was done by Jerry...
Click HERE to see a slide show of the photos from this post.

Metallized Burner Area..

The propane burner that my friend Jerry gave me was still sitting in the wooden area that I made for it. 

The wooden surface underneath the burner was unacceptable to me because I felt it could be dangerous.

I attached aluminum sheeting to all of the wooden surfaces that might come in contact with flames to protect them from catching fire. Safety is my primary concern.

I wanted to make sure that the propane hose going to the burner was moved from the heat area as efficiently as possible.


The propane gas delivery system is not even designed yet.


The picture in the lower right corner shows the finished burner area with all surfaces covered in sheet metal.

I can't wait to start cooking with this burner instead of the butane camping stove that I have been using.

Butane canisters are very expensive.

Click HERE to see a slide show of the photos from this post.

Sunday, October 3, 2010

Mounting the Center Channel Speaker..

I decided that I better get the center channel speaker mounted.

I ran two 2x2's up the center of the wall with a 3 inch separation between them. The purpose of the separation is so that the wiring for the center channel will flow down the center column.

I also wanted to provide a sturdy surface to mount the two 19' LCD monitors that go with my desktop computer system.

We'll see down the road if that center channel location works with the finished console area.
Only time will tell...

Click HERE to see a slide show of the photos from this post.

LED Rope Lighting...

I ordered $100 worth of LED rope lighting from eBay a long time ago when I first got the trailer. At first I was going to wire the whole trailer with one big long rope but then I decided that smaller and more dedicated lengths would be a better choice.

LED Rope lighting is dim compared to CFL or Incandescent lighting but it saves lots of energy and money, especially when the electrical system is provided by a battery bank.

I didn't bother ordering the dojiggers that they say you need to put the pieces of LED lighting ropes together. One of my skills is soldering in the Sound Electrician trade of the Motion Picture industry so I felt quite confident that I could skip those expensive items.
It looks like I'm going to have to order some more LED Rope Lights because I'm out and I'm nowhere near being done.

I have already used 50 feet in various lengths all over this trailer.

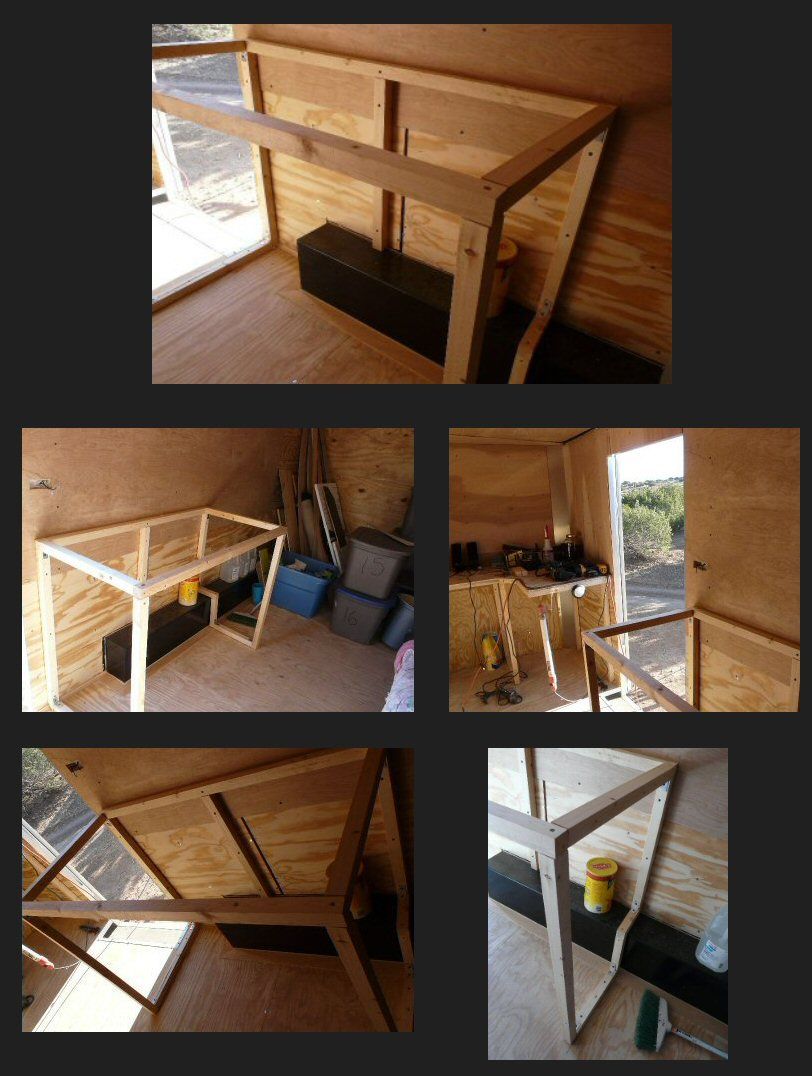
The Console area has LED rope lighting above it and below it. The Kitchenette area has LED rope lighting in the upper cabinet and over the work surface area & the new Battery Bank / Kitchenette Extension / Storage Shelves area has LED rope lighting in some of the storage areas. [coming in a future post]

You'd think I'd be getting sick of creating this living monstrosity but I'm not! I'm having a lot of fun building out this cargo trailer on a daily basis!

Click HERE to see a slide show of the photos from this post.

Installing the Bed Foot Holders...

I decided to install small flat cups on the floor where the feet of the bed normally sit. The point of this installation is to provide an extra bit of resistance from moving when I'm driving the truck and pulling the cargo trailer behind me.

The bed I'm using is a futon which has two positions couch and bed. I like the couch position the best because it provides more room for the walkway, but when I'm having company, the bed position is a way better choice... lol

The flat cups are plastic PVC end caps for rain gutter systems. I got them at Lowe's for around $2 each.

Click HERE to see a slide show of the photos from this post.

Building the Upper Shelf on the Kitchenette

I have been dragging my feet on the uploading of the pics and on the progress I have made.

After creating the basic kitchenette area, I began framing an upper shelf that would be accessible from right in front of the work surface area.

The top work surface area pivots up exposing two wash bins where dishes and utensils will be located.


I attached the wooden work surface to the top of the kitchenette with a very large black hinge.

That black hinge used to be the one on the final part of the ramp in the rear of the cargo trailer.

Jerry and I removed the hinge a long time ago and I just found a new use for a piece of it...yayyyy

The lower right picture shows the finished upper shelf, for now...

[At some point I'll be putting doors on all of the cabinets]

Click HERE to see a slide show of the photos from this post.

Friends... Gotta have em...

Now is a good time to thank the people who have helped me in many different ways with this project so far.

I'd like to thank them Individually... Thank you!

Shane O. - For general support and the use of some of your tools..

Jerry B. - For letting me park my monstrosity in front of your house, and all of the help you have kindly given me in the building and insulating of this trailer...

Craig M. - For loaning me the land and the 110 outlet so I can keep going day after day...

Bob K. - For helping me with the wifi issues and being a knowledgeable electrical / electronic consultant...

Shane F. - For providing me with enough #1AWG wire to interconnect my AGM batteries properly and the crimper and cutting tools to do it safely...

Mom - For listening to me even when I'm a crab and making sure that I'm not dead broke... 

Thank you all for your support and your kindness. I certainly couldn't have done this without you.

:) Owen L.

Saturday, October 2, 2010

The Generator...

Jerry owned this mucked up generator that needed some work and he said
I could have it if I was willing to take it to the small engine repair place to get it serviced.

To show my appreciation to Jerry, I gave him a relatively new refrigerator I had in my storage unit. I bought the refrigerator new and had it for about 8 months before it went into storage indefinitely. I was glad that he could use it and that it no longer was gathering dust in my storage bin.

I took the genny to the small engine repair place and a week later I paid approximately $75 to get it back working great again! :)

Click HERE to see a slide show of the photos from this post.

Tuesday, August 31, 2010

Framing the bathroom walls...

I began the framing of the bathroom walls because I wanted to have additional stability for the utility shelves that I had just built. The left edge of the utility shelves was sagging a bit.


I had to make a cutout for the metal wheel well cover in the wood that creates the first bathroom wall. I covered the wall with the super thin Luan board that I mentioned before.


I intend on making two more walls for the bathroom but I'll have to wait on them until I get more wood.

You may have noticed that the offset vent is perfectly set above where the bathroom is located. This is exactly why a good plan is always best before taking on a project like this. :)

Click HERE to see a slide show of the photos from this post.

Pictures of my cargo trailer... outside

Here are some pictures of the outside of my cargo trailer. As you can see, there are no windows. I want to keep the cargo trailer on the outside looking as authentic as possible. The stealth aspect removes any possible threat since people don't normally associate a cargo trailer with a living environment.

Click HERE to see a slide show of the photos from this post.

Utility Shelves and Laser Printer area...

No home is complete without a color laser printer or utility shelves.. in my opinion anyway.

Just to the left of the Console was an area that looked like it would be great for my color laser printer.

I would want to store paper under it and use the overhead shelf as a plastic bin holder.
The sleeping area had a lot of space above it and I wanted to make use of it.

I set out to create an area where four of the large plastic bins that I have could be stored.

I had to prefab a lot of the project before putting it up and securing it to the wall.


I braced the front edge of the shelves to the Laser Printer shelf on that end, and when the bathroom wall is built, I will brace that to the other end of my utility shelves.

Click HERE to see a slide show of the photos from this post.

Starting the kitchenette..


Now that the Console/Desk area is partially done, I could move on to the Kitchenette area and begin building the basic layout.

I designed the Kitchenette area to accommodate the three plastic drawer organizer things that I got at Walmart. I have alot of three drawer organizers but the white ones seem to be made with less materials.


I created spaces that will allow for the use of any three drawer organizer that fits within the specification of the two types that I have right now.

I wanted to use the Kings Cooker burner that my friend gave me and
I wanted it to be nearest to the door.
 The burner uses propane to cook, and I wanted plenty of ventilation in that area.

I also wanted that same area to double as an area that would hold a second type of stove if I needed it.


I'm happy with the outcome of the Kitchenette area for now... there's lots more to do....

Click HERE to see a slide show of the photos from this post.

Monday, August 16, 2010

The Console / Desk


The console area was a huge job because I wanted to maintain the attractive wood look and also cover up any seams.
I installed an extra one foot strip of Luan wood below the panel that was already installed.

Then I carried the theme to both sides of the Console area.


Now it was time to build the desk portion.

I decided to frame the desk using 2 x 2's and 3/8 ply to provide a sturdy enough workspace and reduce the overall weight.


I knew that the work surface was going to be a challenge because of the rounded nose shape of the trailer. I had to scribe the surface parts to make them fit properly.


Click HERE to see a slide show of the photos from this post.

And the inside...

You can see my butane fueled burner in the top right picture. I use that burner to cook my lunch every day.

The other pictures show how empty the trailer really is at this point.

Now that the insulation portion is over, I can get busy building out the remaining areas of the trailer.


All of my tools and other stuff is strewn all over the floor.

The first area I will focus on building is the Console area at the front of the trailer.

Click HERE to see a slide show of the photos from this post.

On the outside...

Here is a view of the Cargo Trailer from the outside. You can see my tools lined up on the railroad ties.

There's a fan I modified to work on 12 volts, my tool bag, my laptop and some extraneous stuff.

I was notified that the trailer has to be moved because my friends neighbors were complaining.

I will move it to a new location as soon as I can find one...

Click HERE to see a slide show of the photos from this post.

Wednesday, August 4, 2010

Vent trim...

The trim on the vents are finished too. The rear vent has a wider trim ring because I believe it will be over my bathroom / shower area and I thought it would look better. The front vent has a regular type trim ring.

Click HERE to see a slide show of the photos from this post.

AGM Batteries [Absorbed Glass Mat]

I purchased two [2] used AGM Deep Cycle Marine batteries from a guy on eBay.  Here are the specs...

Now I have to do some research on how to charge these things... Averaging 1875 Amps per battery at 12 Volts, these batteries have more than enough current available for all of my power needs. [and then some...lol]

Click HERE to see a slide show of the photos from this post.

The Finished Ceiling

My friend Jerry and I completed the ceiling paneling.
Now every wall has insulation. Jerry skillfully cut the rounded piece to finish off the ceiling.
We used the extra piece of Luan board on the front wall

Click HERE to see a slide show of the photos from this post.

Door Spring adjustments

My friend and I adjusted the door springs so that the ramp will lay flat when I open the rear door.

The springs were originally set for the weight of 3/4 plywood, but with the 3/8 plywood being so much lighter in its place, the rear door would not stay open anymore.

The rear door stays open now!  Yayyyy!

Click HERE to see a slide show of the photos from this post.

Thursday, July 29, 2010

Insulating the ceiling

It was late and I was up.. I couldn't sleep, so I began the task of insulating the ceiling and got finished the next day.

I cut insulation to fit all around the newly installed vents.

I cut insulation to fit between all of the ceiling slats and even put some behind the door springs. I was on a roll and covered the whole ceiling with insulation in less than 4 hours...

The next task ... Put up the Luan board as my new ceiling, then finish off the trim for the vents...

Click HERE to see a slide show of the photos from this post.

Installing the vents

The vents needed to be installed before we continued with insulating the ceiling. Here you can see that the roof is being cut to allow for the two vents.

The vents were both installed with the hinged part towards the front so if the vents were left open while driving, the passing wind would not break off the vent doors.

I got Ventline brand vents with fans on eBay for $41 ea shipped.

The vents are low profile and work great!


Damn.. I'm impressed! So far, everything is looking great!

Click HERE to see a slide show of the photos from this post.

Insulating the rear door

My friend and I removed the 3/4 plywood from back ramp door and filled the spaces with foam insulation like we did with the walls. Later that day we swapped the 3/4 plywood from the rear door of the cargo trailer for 2 sheets of 3/8 plywood at another buddy's house and installed the 3/8 plywood on the ramp door.

Click HERE to see a slide show of the photos from this post.

Friday, July 16, 2010

Installing the door lock

On Saturday July 10th I purchased 5 sheets of super thin board at Lowe's for insulating the ceiling. I spent about $65 on the wood.

My friend installed the door lock in the side door.


After the door lock was installed my friend and I went to the small engine repair place in town and dropped off a small broken generator for servicing. The guy behind the counter said that the maximum charge for fixing it would be $80 but would probably be less than that. He said it will be ready in about a week.

When I got online I purchased 50 ft of 12v cool white LED rope light on eBay for around $110.

I also offered $450 for two used 8D deep cycle AGM batteries to a guy in Oregon through eBay's email system.

Click HERE to see a slide show of the photos from this post.

Insulating the walls

It took us about five hours to complete three walls of insulation.
We insulated the walls with the foam board that my friend gave me for this project.

Later in the day I went to Lowe's Home Improvement store and purchased a door lock and a tube of clear silicone for around $20.

When I got a chance to go online again, I purchased two 14 x14 Ventline brand RV roof vents on ebay for $36 ea plus shipping [$85]. I use another friends address as my physical address so I can receive eBay shipments.


I have full size pictures of the events as they unfold that I plan on putting up as soon as I find a decent slide show program to use.


These pictures complete the three walls. next up is installing the door lock and insulating the ramp door.

Click HERE to see a slide show of the photos from this post.

The Arrival

I went and picked up the cargo trailer on Thursday July 8th. I brought my friend with me cause I know that he has more experience with trailers than I do and he wanted to go. We picked up my futon bed frame at storage on the way home and then I cleaned out the back of the pickup and loaded the stuff into the trailer.

My friend told me that he had some 3/4 foam insulation boards in his attic that he would give me and we could install them in my trailer between the wood paneling and the sidewalls to make the overall trailer more comfortable.
Here are some pictures of when I first got the trailer!

mmmmm.. Top Ramen & A case of water, and L00K....a portable lamp.. cool!


Yup.. that's my suitcase, my laptop and my futon...
 
Click HERE to see a slide show of the photos from this post.

Thursday, July 15, 2010

The Beginning...

I set out to create the perfect stealth living environment. My plan included a relatively large cargo trailer as a starting point because after it's purchase, I wouldn't be able to change things if I found it to be too small. I drew up a few sets of plans but settled on a step by step approach because the whole project could be slightly overwhelming.

 This is the layout that my friend and I decided on for the internal build out.